I know you are itching to start writing programs in assembly language, but before we start our fantastic journey of learning how to code in assembly language, there are certain tools that you should have:
Note: For this tutorial we will be using MS-Visual Studio. To download MS-Visual Studio to your computer, visit the following link:
http://www.visualstudio.com/downloads/download-visual-studio-vs
If you have any troubles installing MS-Visual Studio, visit the following link:
http://msdn.microsoft.com/en-us/library/e2h7fzkw.aspx
Now, you have installed the tools required to get going, you should configure it for the assembly language.
- Assembly Editor
- Debugging Tool
Note: For this tutorial we will be using MS-Visual Studio. To download MS-Visual Studio to your computer, visit the following link:
http://www.visualstudio.com/downloads/download-visual-studio-vs
If you have any troubles installing MS-Visual Studio, visit the following link:
http://msdn.microsoft.com/en-us/library/e2h7fzkw.aspx
Now, you have installed the tools required to get going, you should configure it for the assembly language.
Configuration of MS-Visual Studio for MASM
Follow the following steps to configure Microsoft visual studio for assembly language:- Open the Microsoft visual studio from your desktop, which you have installed earlier.
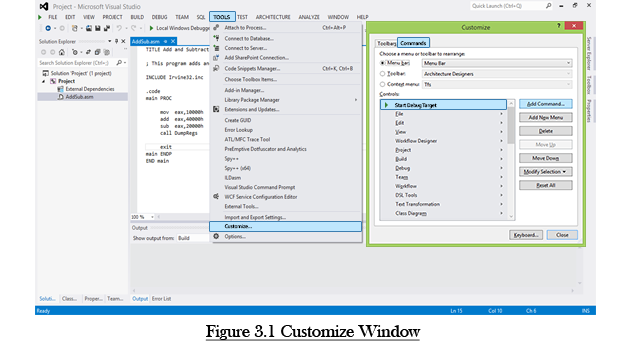
- Go to the TOOLS (located at the toolbar) and click on the CUSTOMIZE option. Following window will appear on your screen.
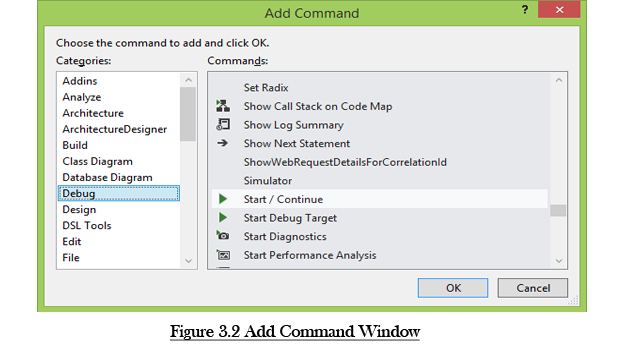
- Click on the Commands tab and then click on the Add Command. You should see the following screen on your monitor/lid.
- Click on the debug option and then select Start/Continue. And click OK.
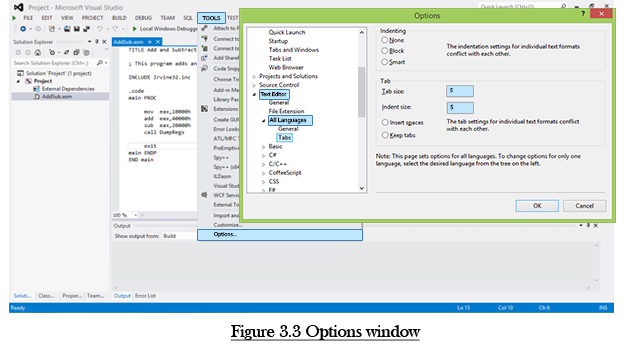
- Now again click on the TOOLS button, and then click on the Options button. New window will appear on your screen as shown in the following figure 3.3.
- Double click on the Text Editor option, and then from the pull-down menu select All Languages and then click on Tabs.
- Enter 5 in the text field present in front of the Tab Size and enter 5 in the text field in front of the Indent Size, as shown in the above figure 3.3, and press OK.
Let’s Run A Program:
- Go to the following link to download the zip file. Which will help us later in writing code.
- For MS-Visual Studio 2010 http://kipirvine.com/asm/examples/IrvineExamplesVS2010a.zip
- For MS-Visual Studio 2012 http://kipirvine.com/asm/examples/IrvineExamplesVS2012.zip
- For any other version of MS-Visual Studio http://kipirvine.com/asm/
- Make a new folder in C drive and rename it to Irvine.
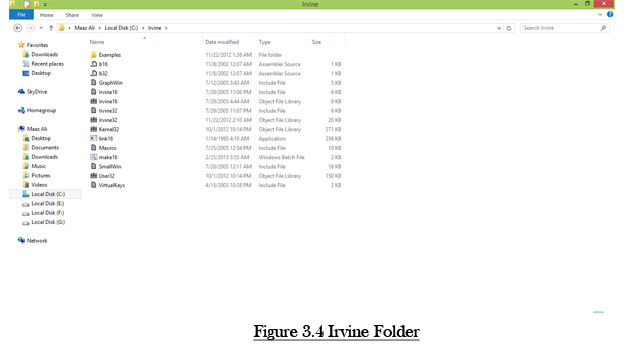
- Now copy the downloaded zip file and extract it into the Irvine folder, you should see the following files (fig 3. 4) on your monitor/lid. Note: If you don’t have access to C drive, make the new folder on desktop with the name Irvine.
- Open MS-Visual Studio and click on the File button. Go to Open and from the pull down menu click on the Project/Solution. A new window will appear on the screen.
- From the new window:
- Open C drive.
- Open Irvine folder
- Open Examples folder.
- Open ch03 folder.
- Open Project folder.
- Open Project.sln file.
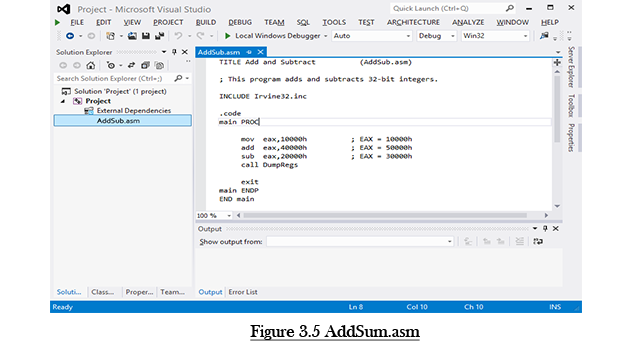
- You should see the following screen on your window. If you don’t see the code on your screen, double click on the AddSum.asm from the solution explorer.
- Press ctrl+F5 and you should see the following console window on your screen. Which shows the output of the program written in addsum.asm file.


.png)


No comments :
Post a Comment
Note: Only a member of this blog may post a comment.